Salesforce Data 360 MCP Server Is in Developer Preview
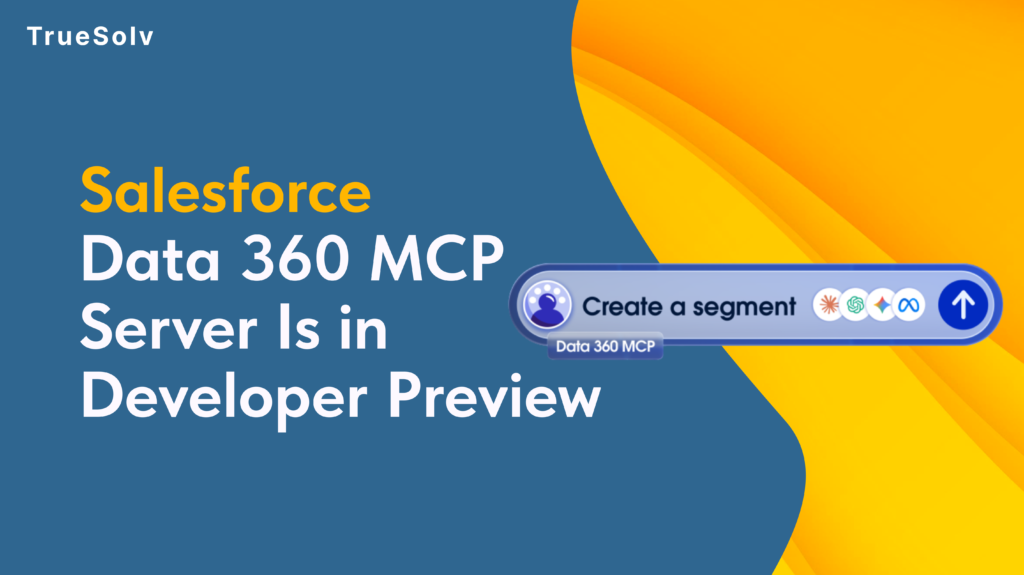
On May 26, Salesforce announced that the Data 360 MCP Server is now in Developer Preview. The idea is direct: every piece of data in your Salesforce Data Cloud is now reachable by any AI agent that speaks Model Context Protocol. Your CRM context, unified customer profiles, real-time data streams — accessible from Claude Code, Cursor, or any MCP-compatible agent tool without writing a custom API wrapper. Data 360 MCP Server — How Data Cloud Connects to AI Agents Salesforce Data Cloud • Unified customer profiles • Audience segments • Calculated insights • Data streams • Identity resolution exposes Data 360 MCP Server Developer Preview Trust Layer protected tool calls MCP-compatible AI agents Claude Code Cursor / Codex Agentforce Studio Custom MCP clients Any agent that speaks MCP No custom API wrapper required. Data arrives through the same trust layer as other Agentforce data access. What the Data 360 MCP Server actually exposes The server gives AI agents structured access to Data Cloud data — unified customer profiles, audience segments, data streams, calculated insights, and identity resolution outputs. These are the data objects that previously required SOQL-like queries against the Data Cloud query engine or custom API development to surface. Through the MCP interface, an agent can retrieve a unified customer profile by identity, query segment membership for a specific individual, pull calculated insight values for an account, or read real-time data stream events — using the same tool-call pattern it would use to interact with any other MCP server, without learning a proprietary API. The significance is in the combination. An agent building a renewal recommendation previously had access to Salesforce CRM data — the account record, the opportunity history, the activity log. What it did not have was the Data Cloud layer: the calculated health score from product usage, the segment membership that reflects behavioural patterns, the cross-channel identity resolution that unifies how the same customer appears across touchpoints. The Data 360 MCP Server adds that layer. Why this changes how agents reason The practical difference between an agent with CRM access and an agent with CRM plus Data Cloud access is the difference between structured records and contextualised customer intelligence. An agent reviewing a renewal opportunity can currently see: account name, ACV, contract end date, last activity log, open support tickets. With the Data 360 MCP Server, that same agent can also see: the customer’s health score calculated from product usage patterns, their segment membership indicating they are in a high-churn-risk cohort, and their identity resolution confirming that two separate records in the CRM are the same individual. Because the data arrives through the MCP interface with the same trust layer protections as other Agentforce data access, the agent’s data handling governance applies uniformly — no separate security configuration needed for the Data Cloud layer. What is available in Developer Preview vs. what is coming Capability Available in Developer Preview Expected at GA Unified customer profile retrieval ✓ Query by identity, return full profile with attributes — Audience segment membership ✓ Query segment membership for a specific individual or account — Calculated insights reads ✓ Return health scores, propensity scores per record — Identity resolution queries ✓ Cross-reference unified identity across touchpoints — Data stream reads ✓ Basic event stream data — subject to Data Cloud sync latency Real-time streaming subscriptions Write-back to Data Cloud ✗ Not yet available Agents will be able to update Data Cloud records based on reasoning output Complex data stream subscriptions ✗ Not yet available Subscribe to data stream events as part of agent trigger logic Production org access ✗ Developer Edition orgs with Data Cloud only Full production org access at GA Developer Preview gives access to the core unified profile retrieval, segment queries, and calculated insight reads. The key constraint is data freshness: Data Cloud data surfaces through the MCP Server with the same refresh latency as the underlying Data Cloud sync. For most use cases this is acceptable. For agents reasoning about real-time events, it is worth understanding the lag characteristics of your specific data streams before building workflows that depend on sub-second freshness. Developer Preview access path Data 360 MCP Server — Developer Preview Access Path4 steps 1Confirm your org has Data Cloud enabledDeveloper Edition orgs with Data Cloud access qualify for Developer Preview. If you do not have a Data Cloud-enabled org, spin up a Developer Edition at developer.salesforce.com — the fastest path to experimenting. 2Enable the Data 360 MCP Server in SetupOpen Setup → search for MCP Servers. The Data 360 MCP Server appears in the available server list for Developer Preview-enrolled orgs. Enable it and configure which agents have access to which data objects.Setup → MCP Servers → Data 360 MCP Server → Enable 3Connect an MCP-compatible clientClaude Code, Cursor, Agentforce Studio, or any MCP-compatible development environment can connect once the server is enabled. The server returns a tool manifest — no custom authentication code required beyond the standard MCP handshake. 4Test with a unified profile retrievalPull a known profile by ID, confirm the MCP Server returns the same data as the Data Cloud UI, and verify that segment membership and calculated insights are included in the response. This confirms the data path is working before building agent logic on top of it. Developer Preview is the right time to experiment, not the right time to build production workflows. Map your architecture, test your data access patterns, and identify what works before GA removes the preview caveats. The orgs that move through this now will deploy faster when GA lands. Data 360MCPData CloudSalesforce DevAgentforce Share: LinkedIn Twitter / X Copy link In this article 01What it exposes 02Why it changes agent reasoning 03Preview vs. GA capabilities 04Access path — 4 steps Developer Preview status Unified profilesQuery by identity — live Segment membershipPer individual — live Calculated insightsHealth scores — live Write-backExpected at GA Production orgsDev Edition only now Quick access path 1️⃣Enable Data Cloud in org 2️⃣Setup → MCP Servers → Enable 3️⃣Connect MCP
Standard Omni-Channel Retirement Salesforce

Today is June 1. Standard Omni-Channel in Salesforce is officially retired. If your org has not migrated to Enhanced Omni-Channel Routing and your production instance hits the Summer ’26 upgrade before you are ready, your agents will not be able to log in to Omni-Channel and work items will stop routing entirely. This is not a beta warning. This is now. ⚠What breaks if your org upgrades without completing the migration Agent loginAgents see an error when attempting to log in to Omni-Channel. They cannot set themselves as Available and cannot receive routed work items until the migration is completed. Work routingIncoming cases, chats, and calls stop routing entirely to any queue using Standard Omni-Channel logic. Work items queue without assignment until an admin completes the migration. Specific channelsLive Agent (Chat), standard SMS, and Facebook Messenger queues are the highest-risk channels. Each requires individual migration before Enhanced routing is enabled — enabling Enhanced routing first on these breaks them even if the main switch was working. ResolutionThe fix requires completing migration steps in production under time pressure, potentially during a service outage. The correct time to do this is now, in a sandbox, not after the upgrade breaks routing. Step 1: Check your current Omni-Channel status Open Setup and search for Omni-Channel Settings. If your org shows Standard Omni-Channel Routing as active, you have not completed the migration. If Enhanced Omni-Channel Routing is enabled, check whether all service channels have been migrated — it is possible to have Enhanced routing active but individual channels still on the legacy configuration. The specific channels that require individual migration steps before you enable Enhanced routing are: Live Agent (Chat), standard SMS channels, and Facebook Messenger. Enabling Enhanced Omni-Channel routing before migrating these channels will break routing for those specific queues. Step 2: Check your production upgrade date Not all production orgs upgrade on the same weekend. The Summer ’26 production upgrade runs across three windows: some instances upgraded May 15, the main production wave is June 5, and the final wave is June 12. Your upgrade date determines how much time you have. Find your instance: Setup → Company Information → Instance field. Then check your specific upgrade date at status.salesforce.com. If your instance upgrades June 5, you have four days from today. If it upgrades June 12, you have eleven. How to find your production upgrade date 1Open Salesforce Setup → search for Company InformationSetup → Company Information → Instance 2Note the instance name (e.g. NA87, EU15, AP5) 3Go to trust.salesforce.com → select your instance → find the Summer ’26 maintenance windowtrust.salesforce.com/status/maintenance Summer ’26 Production Upgrade Waves May 15First wave — selected instances already upgraded. If your org is on this wave, you are already on Summer ’26.Already live June 5Main production wave — majority of orgs. This is Thursday. The window to prepare is today.Tomorrow June 12Final wave — remaining instances. You have until June 11 EOD if your instance is in this wave.7 days left Step 3: Migrate in the correct sequence Enhanced Omni-Channel Migration — Correct SequenceDo in this order 1Migrate individual service channels firstLive Agent (Chat), standard SMS channels, and Facebook Messenger must be individually migrated before you enable Enhanced routing. Enabling Enhanced routing before these migrations breaks them. This is the step most orgs get wrong.Do this before anything else 2Enable Enhanced Omni-Channel RoutingAfter channel migrations in Step 1 are complete, open Omni-Channel Settings in Setup and enable Enhanced Omni-Channel Routing. This is the main routing switch — only flip it after Step 1 is confirmed complete.Only after Step 1 3Verify agent capacity model settingsEnhanced routing uses capacity-based logic that may differ from your Standard configuration. Review queue settings and capacity model assignments in your Summer ’26 sandbox. Confirm routing rules behave as expected with simulated work items.In sandbox first 4Test full agent login and work item routing end-to-endHave a test user log into Omni-Channel in the Summer ’26 sandbox, set status to Available, and accept a routed work item through the full flow. Confirm the item closes and activity is logged correctly before applying these settings to production.Verify before production Step 4: Check for exemptions Two specific scenarios may affect your migration timeline. If your org has a legacy Chat implementation that qualified for a legacy-chat exemption, you may have additional transition time — check your org’s Salesforce communication history for any exemption notification. If your org has not yet agreed to Hyperforce AWS terms, certain Enhanced Omni-Channel features may be unavailable until those terms are accepted. If your production org upgrades before this migration is complete: agents will see an error when attempting to log into Omni-Channel, and work items will not route. The fix requires completing the migration steps under time pressure in a production environment. Completing them now, in a sandbox, is the better version of this conversation. Salesforce Admin Omni-Channel Summer ’26 Service Cloud Share: LinkedIn Twitter / X Copy link In this article 01Check your Omni-Channel status 02Find your upgrade date 03Migrate in the correct sequence 04Check for exemptions ⚠ What breaks if you skip this Agents can’t log in to Omni-Channel All work items stop routing Chat, SMS, Messenger break individually Fix in production = outage pressure Migration sequence 1Migrate channels first 2Enable Enhanced routing 3Verify capacity model 4Test end-to-end in sandbox About the Author ST Sergey Trusov CEO & Salesforce Architect at TrueSolv
How to Use Agentforce to Automate SaaS Renewal Protection
Most SaaS companies do not lose renewals because the product failed. They lose them because nobody noticed the signals in time — usage dropping, a key contact going quiet, a support ticket that never fully resolved. By the time the CS team follows up, the customer has already decided. Agentforce inside Salesforce changes this from a reactive problem to a proactive workflow. Proactive CS motions outperform reactive ones at every stage The signal arrives weeks before the decision. The question is whether your system is watching for it. 67%Higher renewal rate when CS reaches out proactively vs. waiting for the customer to initiate 14 daysAverage time between detectable usage decline and churn — the intervention window most teams miss 80+Accounts per CS rep at a 30-person SaaS company — volume that makes manual monitoring impossible SaaS industry renewal benchmarks. Specific percentages vary by product category, deal size, and CS team structure. Part 1: Why SaaS renewal churn is a data problem, not a people problem The CS team at a 30-person SaaS company is usually one or two people managing 80 or more accounts. They are good at their jobs. They are not able to proactively review every account monthly while simultaneously handling onboarding calls, support escalations, and renewal negotiations. The signals that predict churn are not hidden. Usage declining by 40 percent over two weeks is visible in your product analytics. A key contact going silent for 45 days is visible in your activity log. A support ticket that stayed open for 12 days before resolution is visible in your case management. The problem is that nobody is watching all of these signals simultaneously across 80 accounts. Agentforce agents can. They run continuously against your Salesforce data, evaluate conditions against defined thresholds, and take action when those thresholds are crossed — without requiring a CS rep to remember to check. The data advantage compounds over time. As agents surface patterns — which usage drops correlate with churn, which onboarding milestones predict expansion — your renewal playbook becomes more precise with each cycle. Part 2: What an Agentforce renewal agent actually does An Agentforce renewal agent is an automated system that monitors account health signals, evaluates them against configured thresholds, and takes a defined action when a threshold is crossed — without human initiation. Agentforce Renewal Workflow — How a churn signal becomes a CS action Data Signals • Usage −40% / 14d • No contact 45+ days • Open support tickets • Contract 60d away Monitors Agentforce Renewal Agent Evaluates all signals simultaneously • 24/7 Triggers Autonomous Actions Priority CS task assigned to account owner Account summary usage + contacts + tickets Churn risk flag renewal dashboard alert Draft renewal email queued for CS review No human initiation required. Agent runs continuously against Salesforce data. The distinction from a standard Salesforce Flow is the reasoning layer. A Flow fires when a condition is met. An Agentforce renewal agent evaluates the condition in context — weighing multiple signals simultaneously, generating a natural language summary of what it found, and drafting context-aware communication that a Flow cannot produce. Part 3: Three renewal agent workflows worth building first Workflow 1 60-day renewal outreach agent Trigger:Contract end date is 60 days away. What it does:Reviews account health signals — product usage trend over the last 30 days, open support issues, last contact date, any logged expansion signals. Drafts a personalised renewal email with specific context from the account record. Queues the draft for CS review with a task to approve or revise within 48 hours. Why it works:A calendar reminder tells the rep to follow up. This agent tells the rep what the account looks like right now, drafts the message, and makes the rep’s job to review and send — not to research and write. The rep’s 20 minutes of prep becomes 5 minutes of review. Expected outcome: Higher quality renewal outreach, earlier in the cycle, with no additional CS capacity required. Workflow 2 Churn risk alert agent Trigger:Product usage drops more than 40 percent over a 14-day window compared to the prior 14 days. What it does:Flags the account with a Churn Risk tag in Salesforce. Creates a priority task for the account owner. Generates an account summary: last contact date, open support issues, usage trend, contract value and end date, any recent expansion or contraction signals. Why 14 days:The most actionable churn signals happen 30 to 60 days before renewal. A 14-day usage decline detected at 60 days out gives the CS team time to intervene before the customer has made a decision. Detected at 5 days out, the same signal is too late. Expected outcome: CS team prioritises the highest-risk accounts with full context before the intervention window closes. Workflow 3 Post-onboarding health agent Trigger:New subscription start date is 30 days ago. What it does:Checks whether the account has hit three key activation milestones. If all three are met, logs the health check and takes no further action. If one or more are not met, creates a targeted outreach task with a guided onboarding checklist attached and flags the account for a CS review. Why it matters:Customers who do not activate in the first 30 days are significantly more likely to churn at their first renewal. A health check at 30 days identifies at-risk customers at the moment where intervention — a 20-minute call, a targeted email with specific steps — is most likely to work. Expected outcome: Improved 30-day activation rates, lower first-renewal churn, CS effort focused on accounts that need it. Agent workflow Trigger What the agent does Expected outcome 📅 60-day renewal outreach Contract end date is 60 days away Reviews account health, drafts personalised renewal email, queues for CS review with 48-hour approval task Higher quality, earlier renewal outreach. Rep prep: 20 min → 5 min review. ⚠️ Churn risk alert Product usage drops 40%+ over 14-day window Flags account, creates priority task, generates account summary with full context CS prioritises at-risk accounts with
Summer ’26 Flow Updates: Six Things That Will Actually Change How You Build Automations

Every Salesforce release, the Flow section of the release notes is the one worth reading first. Summer ’26 did not disappoint — new date operators, batch size control for scheduled flows, collapsible fault paths, natural language updates for Screen Flows via Agentforce, and a genuinely better radio button experience. Here is the full breakdown of what landed, what it does, and when you would actually use it. Feature What it does Who benefits most 📅 Date Field Operators New operators: Is Today, Is Tomorrow, Is On, Anniversary. Applies to Date fields only — not DateTime. Admins building renewal reminders, SLA tracking, birthday campaigns, or any time-sensitive record logic. Eliminates the need for formula field workarounds. ⚙️ Scheduled Flow Batch Size Custom batch size control instead of the fixed default of 200. Smaller batches = lower governor limit risk. Larger batches = faster processing. Any org running Scheduled Flows against unpredictable record volumes. High-value for flows with DML operations or external callouts. 🗂️ Collapsible Fault Paths Fault paths in Flow Builder can now be collapsed. Canvas continues the visual cleanup started in Spring ’26 with collapsible Decisions and Loops. Admins managing complex flows with shared error-handling subflows. Large production flows become significantly more readable. 🤖 Natural Language Screen Flow Updates Agentforce natural language editing now supports Screen Flows. Describe a change in plain language, Agentforce makes the adjustment. Early access — review required. Admins who want to trial Agentforce-assisted flow building. Works well for additive changes with clear descriptions. Complex logic still needs manual work. 🔘 Radio Button Group New compact visual component replacing standard radio buttons in Screen Flows. Horizontal and vertical layout options, less vertical space per option. Any admin who has built Screen Flow intake forms and found standard radio buttons too space-heavy. Direct UI improvement for end users. 📧 Email Template Deployment Fix Send Email Actions using Email Templates now deploy correctly between environments. Fix is in “Show advanced options” in the action properties. Orgs with proper sandbox-to-production workflows who have been maintaining environment-specific flow versions as a workaround. One-time fix. 1. New date field operators Flow now supports four new date operators: Is Today, Is Tomorrow, Is On, and anniversary-based matching for date fields. For any flow that does time-sensitive record logic, this is a meaningful improvement over the workarounds that previously required formula fields or date math. The practical applications are immediate. A renewal reminder flow that should trigger 30 days before the contract end date can now use Is On with a relative date formula rather than a calculated checkbox field. A birthday-triggered campaign can fire using the anniversary operator without building a custom evaluation layer. Any flow checking whether a date falls within a specific window benefits directly. One important constraint: these operators apply to Date data types only, not DateTime. If your date field includes a time component, the new operators will not be available. This is worth checking against your object schema before building. Summer ’26 — New Flow Date Operators Quick Reference Is Today Matches records where the date field equals the current date. Ideal for daily-run flows that flag due-today tasks, contracts expiring today, or time-sensitive SLA conditions. Is Tomorrow Matches records where the date field equals tomorrow’s date. Use for advance notification flows — renewal reminders, follow-up triggers, appointment confirmations the day before. Is On Matches records where the date field equals a specified date or relative date formula. Most flexible of the new operators — covers “is on the first of next month” and similar calculated dates. Anniversary Matches records where the month and day of the date field match the current month and day, regardless of year. Use for birthday campaigns, contract anniversary workflows, and renewal sequences tied to the same calendar date each year. ⚠ Important: these operators apply to Date fields only — not DateTime. Check your field type before building. 2. Batch size control for Scheduled Flows Scheduled Flows now support a custom batch size setting. The default has always been 200 records per batch, which is a sensible baseline for most use cases but creates problems when qualifying record counts are unpredictable and the flow logic includes DML operations, callouts, or other governor limit-sensitive steps. Smaller batch sizes reduce the risk of hitting limits when record volume spikes. A flow that runs cleanly on 200 records can fail when it processes 1,400 and the batch triggers 200 SOQL queries rather than 200. Reducing the batch to 50 adds processing time but removes the failure risk. The tradeoff runs in both directions. Larger batches complete the full scheduled run faster when record volume is stable and governor limits are not a concern. The new control lets admins tune this explicitly rather than accepting a single default for every scenario. 3. Collapsible Fault Paths Fault paths can now be collapsed in Flow Builder, following the Spring ’26 changes that added collapsible Decisions and Loops. This is a quality-of-life improvement rather than a capability change — fault paths do not behave differently when collapsed — but for anyone managing complex flows with shared error-handling subflows, the canvas clarity improvement is real. Large production flows become difficult to read when fault paths branch from every element that can fail and the canvas becomes a sprawl of error-handling logic. Collapsing fault paths lets admins focus on the main execution path during review and debugging, and expand fault handling when needed. 4. Update Screen Flows with natural language via Agentforce Agentforce-powered natural language editing, which launched for Record-Triggered and Scheduled Flows in Spring ’26, now extends to Screen Flows in Summer ’26. Admins can describe the change they want in plain language — ‘add a required email field before the address step’ — and Agentforce makes the adjustment in Flow Builder. This feature is in early access and the honest framing is the right one: it works well for additive changes that are clearly described. Reorganising a complex screen, adjusting conditional visibility rules, or changes that require
Salesforce Summer 26 Developer Features

Every Salesforce Summer ’26 release has one developer feature that teams have been waiting for since approximately forever. LWC Component Preview is finally generally available. State Management for LWC reaches full GA. And the new Release Manager beta introduces a three-channel preview system that changes how teams stay ahead of what is coming. Here is the full rundown. LWC Component Preview finally GA This is the one. Anyone who has spent 90 seconds watching a Salesforce page reload to verify a two-line CSS change understands what this feature means for development speed. LWC Component Preview lets you see a single Lightning Web Component render in the browser or in VS Code without triggering a full page refresh. The feature has been in preview for several releases. Reaching GA in Summer ’26 means it is now stable, supported, and deployable in production orgs. The practical impact on iterative component development — particularly for orgs building complex page architectures with multiple custom components — is immediate and significant. State Management GA in Summer ’26 State Management for LWC is now fully generally available. The feature adds centralised state management across component trees — solving a problem that every developer building complex page architectures with multiple LWC components has run into: coordinating shared state without lifting it through the entire component tree via props. Salesforce Release Manager Beta — Three Channels 🏭 Standard Stable production The familiar quarterly release. Fully tested, fully supported, available in all sandboxes and production orgs. Best for Production orgs. Teams that need predictability above all else. The default for every Salesforce org. ⚡ Accelerated Production-ready early Features that are complete and tested but not yet in a major quarterly release. Earlier access, same quality bar as Standard. Best for Teams that want new capabilities before the next quarterly drop. Sandbox testing of features that are not yet in Standard. 🔬 Dev Active development Features in active development. Not production-ready. For evaluation, feedback, and planning — not for customer-facing work. Best for Developers who want to evaluate upcoming platform direction. Architects planning ahead. Never for production use. The practical benefit is cleaner data flow, less imperative code for managing shared state, and more predictable component behaviour when multiple components on a page need to respond to the same underlying data. For orgs building Opportunity detail pages with line items, totals, and discount components that all need to update from the same source, this removes a significant amount of coordination boilerplate. Salesforce Release Manager beta The Release Manager is the most strategically significant developer feature in Summer ’26. It gives developers access to three distinct release channels: Before: prop-drilling across components Without State Management // ParentComponent.js // Must pass totalMrr down to // every child that needs it export default class ParentCmp { @track totalMrr = 0; @track discount = 0; @track finalPrice = 0; } // Must wire props manually // to LineItems, Totals, Discounts // components separately After: centralised state store With State Management // oppStore.js — shared state import { createStore } from ‘@salesforce/state’; export const oppStore = createStore({ totalMrr: 0, discount: 0, finalPrice: 0 }); // Any component subscribes directly // No prop drilling needed Both LineItems, Totals, and Discounts components subscribe to oppStore directly — no parent coordination needed Standard: the stable production release. Familiar, predictable, the channel your production org is already on. Accelerated: production-ready features that are complete but not yet in a major release. These are features Salesforce has shipped and tested but held back from the standard release cycle. For teams that want to adopt new capabilities ahead of the next quarterly release, this is the channel. Dev: new features in active development. Not production-ready, not suitable for anything close to customer-facing work, but the right channel for teams that want to evaluate and influence upcoming platform direction. The Release Manager represents a meaningful shift toward continuous delivery for Salesforce. Historically, the three-times-a-year release cycle has meant long waits between features shipping at Salesforce and becoming available to developers. The Accelerated channel closes that gap considerably. Custom Flow Screen Component Styling Hooks Developers building custom Screen Flow components in LWC can now expose CSS styling hooks — color, border radius, font weight, and other SLDS attributes — so admins can customise the visual appearance of shared components without touching the component code. The practical scenario: an org has multiple business units sharing a common intake form component. The component logic is identical but each business unit needs different branding. Previously, the developer either maintained multiple versions of the component or the admin had no control over the visual output. Styling hooks solve this cleanly — one component, admin-configurable appearance per context. React support via Multi Framework (Beta) Salesforce Multi Framework enters beta in Summer ’26, allowing developers to build with ReactJS hosted natively on Salesforce, with data accessed via GraphQL and full integration with Agentforce Vibes. This is the most significant frontend architecture announcement in the release, and it deserves an honest take. The LWC-only frontend story is over. Salesforce is acknowledging that the developer ecosystem it wants to attract builds in React, and that requiring teams to learn a Salesforce-specific component model is a friction point that affects adoption of the platform for new development. The complication is a third UI model alongside LWC and the Agentforce Experience Layer. Orgs making frontend architecture decisions now face a genuinely more complex set of options. The article’s recommendation: Multi Framework is Beta and the right time to evaluate it is in preview orgs, not production. 5 Things Developers Should Test in Their Summer ’26 Preview Sandbox Before May 9 1 LWC Component Preview with your most complex component Open a custom LWC component in VS Code, make a CSS change, and preview it without a full page reload. Test with a component that has nested child components to confirm the preview reflects the full hierarchy correctly. GA — test for your stack 2 State Management on a page with multiple components
Salesforce Summer 26 Admin Checklist
Most orgs get surprised by Salesforce releases. Not because the dates are hidden — they are published months in advance — but because the checklist for actually preparing keeps getting skipped until something breaks in production. Summer ’26 sandboxes start upgrading around May 9. Here is a practical six-step admin prep list so that date does not catch you off guard. Summer ’26 — Main Upgrade Weekends ~May 9 Sandbox preview orgs upgradeVaries by instance — check trust.salesforce.com for your exact date ~June 5 First non-preview sandbox weekendMost non-preview sandboxes on NA and EU instances ~June 12 Second non-preview sandbox weekend + Production beginsProduction orgs start upgrading — varies by instance The six steps worth completing before May 9 Step 1: Find your instance and exact upgrade date Not all Salesforce instances upgrade on the same weekend. Your specific upgrade date depends on the instance your org runs on, and there are three main release weekends across May and June. Find your instance in Setup under Company Information, then check the Salesforce Trust maintenance calendar for the exact date. This matters because ‘around May 9’ could mean May 9 or it could mean June 12 depending on your instance. Knowing your actual date changes how urgently the rest of this checklist needs to happen. Salesforce Trust maintenance calendar Step 2: Review the Summer ’26 release notes for your specific stack The full release notes are long. The useful shortcut is to search for ‘enforcement’ in the notes, because enforcement items are the changes that will be applied automatically — including to orgs that have not opted in to anything. Two items affect most orgs: the accessibility enforcement for components at 200 percent zoom, and the X (Twitter) Auth Provider callback URL change that requires manual reconfiguration. Both are breaking changes for the orgs they affect. Neither fixes itself after the upgrade. Salesforce Summer ’26 release notes Step 3: Audit your Connected Apps and External Client Apps status Summer ’26 tightens the External Client Apps enforcement that began in Spring ’26. If your org has Connected Apps your team created — not vendor-installed managed package apps, but apps your own admins or developers built — check whether they have been migrated. Apps that have not been migrated will face increasing enforcement pressure in Summer ’26. Connected Apps migration guide Step 4: Decide between preview and non-preview sandbox Preview sandboxes opt in to the Summer ’26 upgrade early, giving you more time to test before the production release. Non-preview sandboxes stay on the Spring ’26 release longer, giving you more time with a stable environment. Neither choice is universally correct — it depends on how many customisations you have to test and how much development work is currently in flight. The Salesforce Sandbox Preview Guide explains how to make the switch if you want to opt your sandbox into preview before the window closes. Summer ’26 Admin Prep — 6 Steps Before May 9 Complete before upgrade 1 Find your instance and exact upgrade date Setup → Company Information → note your instance (e.g. NA87). Check trust.salesforce.com/status/maintenance for your exact date. “Around May 9” could mean May 9 or June 12 depending on your instance. 5 minutes 2 Search “enforcement” in the Summer ’26 release notes Enforcement items are auto-applied — you do not opt in. The two that affect most orgs: accessibility enforcement for components at 200% zoom, and the X (Twitter) Auth Provider callback URL change that requires manual reconfiguration. Breaking changes 3 Audit your Connected Apps and ECA migration status App Manager → filter by Connected App → identify apps your org created (not vendor managed packages). If any have not been migrated to External Client Apps, Summer ’26 tightens enforcement further. Act now if pending 4 Decide: preview sandbox or non-preview? Preview gives you more testing time before production upgrades. Non-preview gives you a longer stable window during active development. The Salesforce Sandbox Preview Guide covers how to opt in. Window closes before May 9. Decision needed 5 Review Scheduled Flows that process large record volumes Summer ’26 introduces custom batch size control for Scheduled Flows. The default of 200 is now configurable. Flag any flow where governor limit errors are a known risk — set appropriate batch sizes before the first run on the new release. New control available 6 Bookmark the Release Manager beta opt-in New in Summer ’26: three release channels — Standard (stable), Accelerated (production-ready, not yet in major release), Dev (in active development). Opt in now for earlier visibility into what comes after Summer ’26. New capability Step 5: Review Scheduled Flows that process large record volumes Summer ’26 introduces custom batch size controls for Scheduled Flows. The default batch size of 200 records is now configurable. Any flow processing large record volumes where governor limit errors are a known risk should be reviewed before the upgrade lands, so you can set appropriate batch sizes from the first run on the new release rather than after the first failure. Step 6: Bookmark the Release Manager beta opt-in New in Summer ’26, the Salesforce Release Manager gives admins and developers access to three feature channels: Standard for stable production behaviour, Accelerated for production-ready features not yet in a major release, and Dev for features in active development. This is a significant shift toward continuous delivery. Opting in now gives your team earlier visibility into what is coming after Summer ’26, rather than discovering it in the next release notes drop. Six steps, one week. Admins who work through this before May 9 spend the upgrade weekend watching things work. Everyone else spends it finding out what broke. Already testing Summer ’26 features in your sandbox? If your org needs a second pair of eyes before the upgrade, our team at truesolv.com does exactly that. Follow us on LinkedIn for release-critical updates every week.
Salesforce Summer 26 Release

Summer ’26 sandboxes start upgrading around May 9. Release notes dropped April 22. If you have not looked at them yet, the window before your sandbox looks different and your customisations start behaving unexpectedly is narrow. This is the short version of what is actually changing — not the full list of every feature, but the things admins and developers should know about before the upgrade arrives. Consideration Preview Sandbox Non-Preview Sandbox When it upgrades Early — around May 9 Upgrades ahead of production release Later — June 5 or June 12 Stays on Spring ’26 longer Testing window for Summer ’26 Longer — you have weeks to validate customisations before production upgrades Shorter — less time between sandbox and production upgrade Stability during active development Lower — your sandbox is on new code while dev work is still in progress Higher — dev work continues on stable Spring ’26 release Best for orgs with Many customisations to validate, time-sensitive compliance testing, proactive release teams Active development sprints, tight deadlines, small teams without dedicated release bandwidth How to opt in Follow the Salesforce Sandbox Preview Guide — window closes before May 9 No action required — non-preview is the default What is in Summer ’26 that admins need to know Agentforce woven into CRM surfaces Summer ’26 moves Agentforce from a standalone layer to something embedded in daily Sales Cloud and Service Cloud workflows. AI summaries, deal coaching suggestions, and automated research appear directly in the views reps already use. For admins, this means any customisations built against these surfaces — record detail layouts, list views, service console components — may need testing against the new Agentforce-aware UI before the upgrade lands. Flow UI improvements: collapsible fault paths and readable data tables Large production flows are hard to maintain when the canvas is an unnavigable tangle of fault paths and unformatted data. Summer ’26 adds collapsible fault paths and a significantly improved data table display inside Flow Builder. These are cosmetic in that they do not change flow behaviour, but the maintenance benefit is real for any org with complex automations. Additionally, Summer ’26 extends Agentforce-powered natural language editing to Screen Flows, having added it to Record-Triggered and Scheduled Flows in Spring ’26. This remains an early-access feature and requires review before applying suggestions to production flows. Accessibility enforcement at 200 percent zoom Salesforce is enforcing accessibility standards for UI components at 200 percent browser zoom in Summer ’26. For orgs with custom Lightning components, custom page layouts, or Visualforce pages, this may produce unexpected layout behaviour that needs testing before the upgrade. Standard Salesforce Lightning components are already compliant. Custom-built components need to be checked. External Client Apps migration enforcement tightens Spring ’26 disabled new Connected App creation across all orgs. Summer ’26 tightens the enforcement further. If your org has Connected Apps that have not been migrated to External Client Apps and your integration depends on them, this is the release where that becomes an active problem rather than a pending one. The Connected Apps that require action are the ones your org created and manages. Managed package apps from vendors are not affected. X (Twitter) Auth Provider callback URL change If your org uses X (formerly Twitter) as an OAuth provider for login or integration, the callback URL configuration requires manual reconfiguration in Summer ’26. This is a small but breaking change for orgs that use it — it will not fix itself automatically. Find it in Setup under Auth. Providers. AI Content Summarizer component available in Lightning App Builder A new AI Content Summarizer component can be dropped onto any Lightning record page directly from App Builder without writing Apex. For admins who want to surface Agentforce value to end users quickly and without a full development engagement, this is the most accessible on-ramp in the Summer ’26 release. Salesforce Summer ’26 release notes ⚠ ECA enforcement tightens in Summer ’26 — what breaks if you skipped Spring ’26 prep Spring ’26 change New Connected App creation was disabled across all orgs by default. A Salesforce Support request could re-enable it — temporarily. Summer ’26 change Enforcement tightens further. The Support workaround is being phased out. Orgs with unmigrated Connected Apps face an increasing compliance and functionality risk. What breaks Integrations that depend on Connected Apps you built and manage — not managed package vendor apps — will face disruption if migration is not completed. Managed package apps are not affected. Action needed Open App Manager → filter by Connected App type → identify apps your org created → confirm migration status. Apps not yet migrated need to move to External Client Apps before enforcement completes. Have questions about anything in the Summer ’26 release notes that could affect your org? That is exactly the kind of thing our team digs into every release cycle. Reach out through truesolv.com. Follow us on LinkedIn for weekly Salesforce release breakdowns.
How to Find Your SaaS PQL in Salesforce
Product-led growth gets talked about as a marketing strategy. It is actually a data strategy. The moment a user signs up for your free trial, they start telling you exactly how likely they are to pay, through every click, every feature they open, and every session they skip. Most SaaS sales teams have no idea any of that is happening. None of it is in their CRM. What is a Product-Qualified Lead? A Product-Qualified Lead, or PQL, is a user who has reached a meaningful milestone inside your product. They activated a key feature, hit a usage threshold, invited a teammate, or upgraded their storage. Whatever the milestone is, they are doing the thing your product is designed to do. That makes them different from every other lead type in your funnel. A Marketing-Qualified Lead clicked an ad or downloaded an ebook. A Sales-Qualified Lead filled out a demo form. Neither has actually used your product. A PQL has, and in most PLG companies, that difference shows up as a 3% conversion rate versus a 25% one. Furthermore, PQLs are consistently underused. Not because companies do not want to act on them, but because the signal lives somewhere the sales team cannot reach. Why the PQL signal gets wasted without CRM integration Product analytics tools capture this data well. Segment, Mixpanel, PostHog, and Amplitude track every session, every feature interaction, and every drop-off point with precision. The dashboards are detailed. The data is there. However, your sales team is not in those dashboards. They are in the CRM. And in most PLG SaaS companies, those two systems do not talk to each other. The result is a structural disconnect. Your product knows which users activated three core features in a seven-day trial. Your reps are calling people who downloaded a whiteboard template six weeks ago. Meanwhile, the user who is two steps from converting sits uncontacted in your product database, not in your pipeline. This is not a prioritisation problem. It is a data infrastructure problem. Specifically, it is fixable. PLG Trial-to-Paid Funnel in Salesforce Trial Signup by source & channel Activation key feature milestone reached PQL Trigger usage threshold, invite, or score met Sales Action rep task auto-created in Salesforce Closed-Won Here is what four common PQL triggers look like in practice. 1. Trial activation trigger A user activates three core features within seven days of signing up. Salesforce creates a task for a rep to reach out with a targeted expansion message. The rep sees the activation data directly on the Lead record. 2. Churn risk alert A user’s engagement drops below their baseline for 14 consecutive days. Salesforce creates a CS alert before the churn event. The CS team can intervene with full context on what the user did and did not do. 3. Account expansion signal Five or more users at the same account invite colleagues during the trial period. Salesforce scores the Account higher and moves it into an expansion workflow automatically. 4. Free-to-paid attribution A free-to-paid conversion is tracked as a closed Opportunity, connected to the original trial Lead record. Marketing attribution becomes real, not estimated. Situation Without PQL data With PQL data in Salesforce Who reps contact first Demo form leads, regardless of product activity Users who activated key features, ranked by engagement score What reps see on a Lead record Name, email, company, source Features activated, sessions logged, days since last login, PQL status Churn detection Customer cancels, CS finds out after the fact Usage drop triggers CS alert at day 14, before churn event Free-to-paid attribution Estimated or modelled based on last-touch channel Closed Opportunity linked directly to original trial Lead record Account expansion signals No visibility until a user reaches out or upgrades manually Automatic score increase when 5+ teammates invited during trial PLG funnel visibility Sign-up volume and revenue, nothing in between Full funnel: signup, activation rate, PQL rate, closed-won from trial How to build this in Salesforce The most practical starting point is a set of Custom Fields on the Lead or Contact record that reflect product activity. You do not need a full Customer Data Platform to get started. You need a clean data feed and clear trigger logic. 3 PQL triggers worth setting up first 1 Feature activation trigger User activates 3 or more core features within 7 days of signing up. This is the clearest signal that the product is working for them, and the highest-intent moment to start a conversation. Trigger: 3 features in 7 daysAction: Rep task created in Salesforce 2 Churn risk trigger User engagement drops below their personal baseline for 14 consecutive days. Acting at day 14 gives CS enough lead time to re-engage before the user mentally cancels. Trigger: 14-day usage dropAction: CS queue alert in Salesforce 3 Account expansion trigger Five or more users from the same account invite colleagues during the trial period. Team adoption during trial is one of the strongest predictors of a paid conversion at the account level. Trigger: 5+ teammate invitesAction: Account score increase + expansion workflow Step 1: Define your PQL criteria Before any configuration, decide what product-qualified means for your specific product. Pick two or three behaviours that correlate with paid conversion in your existing data. Common examples include activating a specific feature, reaching a usage volume threshold, or completing an onboarding checklist. If you do not have conversion data yet, start with Salesforce Trailhead’s PLG resources or the Salesforce Admins blog for benchmark guidance on typical SaaS activation signals. Step 2: Connect your product data to Salesforce The most common paths are a native integration from your analytics tool, a Salesforce-connected webhook from your product backend, or a middleware tool like Segment Connections or Census. Each approach writes product events into Salesforce fields or Custom Objects. Step 3: Build the trigger logic in Salesforce Flow Use Salesforce Flow to create the automation. When a product field meets your PQL criteria, Flow triggers an action. That action
How to Enable Setup with Agentforce in Spring ’26
You know that moment when you are three tabs deep in Salesforce documentation, trying to remember where that one setting lives?
How To Debug Apex Code Without Losing Your Mind

Apex does not come with a pause button. There is no traditional breakpoint that stops execution and lets you poke around. What Salesforce gives you instead is a set of logging, inspection, and replay tools that, used well, make finding the problem faster than most developers expect. This guide covers the practical workflow from first error to confirmed fix, with examples at each step. Step 1: read the error before you do anything else Most debugging sessions start with someone jumping straight into the code. The error message is still the fastest path to the problem, and it is worth reading carefully before opening any tool. Salesforce Apex errors typically tell you the class name, the line number, and the exception type. A System.NullPointerException at line 42 in AccountTriggerHandler is telling you exactly where to look. A System.LimitException: Too many SOQL queries: 101 is telling you the problem is structural, not a typo. The three most common Apex exceptions and what they signal: NullPointerException A variable you expected to have a value is null. Usually means a query returned no records, or an object field was never set. LimitException A governor limit was hit. SOQL inside a loop is the classic cause of the 101 SOQL queries error. DmlException A database operation failed. Required field missing, validation rule violation, or duplicate record are the usual culprits. Step 2: add System.debug() to trace what is happening System.debug() is the starting point for most Apex debugging. It writes output to the debug log, which you can then read to understand what your code was actually doing at each point. Place debug statements before and after the line you suspect is failing, and log the values of the variables involved. Basic System.debug() usage Account acc = [SELECT Id, Name, OwnerId FROM Account WHERE Id = :accountId LIMIT 1]; System.debug('Account retrieved: ' + acc); System.debug('Owner ID: ' + acc.OwnerId); The LoggingLevel parameter controls how much noise you produce in the log. Use LoggingLevel.DEBUG for general tracing and LoggingLevel.ERROR for conditions that should never occur. Using log levels to filter output System.debug(LoggingLevel.DEBUG, 'Entering processAccount method'); System.debug(LoggingLevel.ERROR, 'Account is null – this should not happen'); System.debug(LoggingLevel.FINEST, 'Loop iteration value: ' + i); Setting the log level to FINEST captures everything. That is useful when you have no idea where the problem is. Once you narrow the location down, reduce it to DEBUG to keep the log readable. Step 3: enable debug logs and read them in Developer Console Debug statements only appear if logging is active for the user running the code. Setting up a trace flag takes two minutes and is required before any logging will appear. Go to Setup search for Debug Logs in the Quick Find box. Click New select the user you want to trace, set an expiry time, and choose a debug level. Start with SFDC_DevConsole if you are not sure which level to use. Reproduce the issue trigger the code by running the action that causes the error. Open Developer Console go to the Logs tab and double-click the most recent log entry. Use the filter type the class or method name you are debugging to isolate relevant lines from the noise. The log output includes a timestamp, event type, and the message from your System.debug() call. What to look for: USER_DEBUG lines contain your System.debug() output SOQL_EXECUTE lines show every query that ran and how many rows it returned DML_BEGIN and DML_END wrap every database operation CUMULATIVE_LIMIT_USAGE near the end of the log shows governor limit consumption Step 4: use Execute Anonymous to isolate and test When you want to test a specific piece of logic without triggering the full context of a trigger or flow, Execute Anonymous is the fastest tool available. It runs Apex directly in the org against real data, and the debug log appears immediately. Open it from Developer Console under Debug, then Open Execute Anonymous Window. Testing a query and inspecting results in isolation Id testAccountId = '0015g00000XXXXXX'; List<Account> accts = [ SELECT Id, Name, AnnualRevenue, OwnerId FROM Account WHERE Id = :testAccountId ]; System.debug('Records found: ' + accts.size()); if (!accts.isEmpty()) { System.debug('Account name: ' + accts[0].Name); System.debug('Annual revenue: ' + accts[0].AnnualRevenue); } This approach lets you confirm whether the data you expect to be there actually is, before assuming the logic is wrong. Many debugging sessions end here because the data was the problem, not the code. Step 5: use Apex Replay Debugger for complex flows For situations where System.debug() alone is not enough, VS Code’s Apex Replay Debugger lets you step through a captured debug log line by line, inspect variable values at each point, and set breakpoints on specific lines without stopping real execution. This is the closest Apex gets to a traditional debugger, and it is free with the Salesforce Extension Pack for VS Code. Open the Apex class or trigger in VS Code click in the gutter to the left of the line numbers to set a breakpoint. Enable the replay debugger open the Command Palette with Ctrl+Shift+P and run SFDX: Turn On Apex Debug Log for Replay Debugger. Reproduce the issue in the org trigger the code that is failing. Fetch the log Command Palette, then SFDX: Get Apex Debug Logs, and select the relevant log. Launch the replay Command Palette, then SFDX: Launch Apex Replay Debugger with Current File. Execution will pause at your breakpoints and you can inspect variable values in the VS Code sidebar. Replay Debugger does not run code again. It replays a captured log, so the variable values you see reflect what actually happened during the original execution. This is exactly what makes it useful for reproducing intermittent bugs. Step 6: identify governor limit issues before they become production problems Governor limits are the category of Apex errors that can reach production undetected in low-volume testing and then fail at scale. The most common is the 101 SOQL queries limit caused by queries inside loops. The pattern that causes 101