Salesforce Field Level Security Summer 26
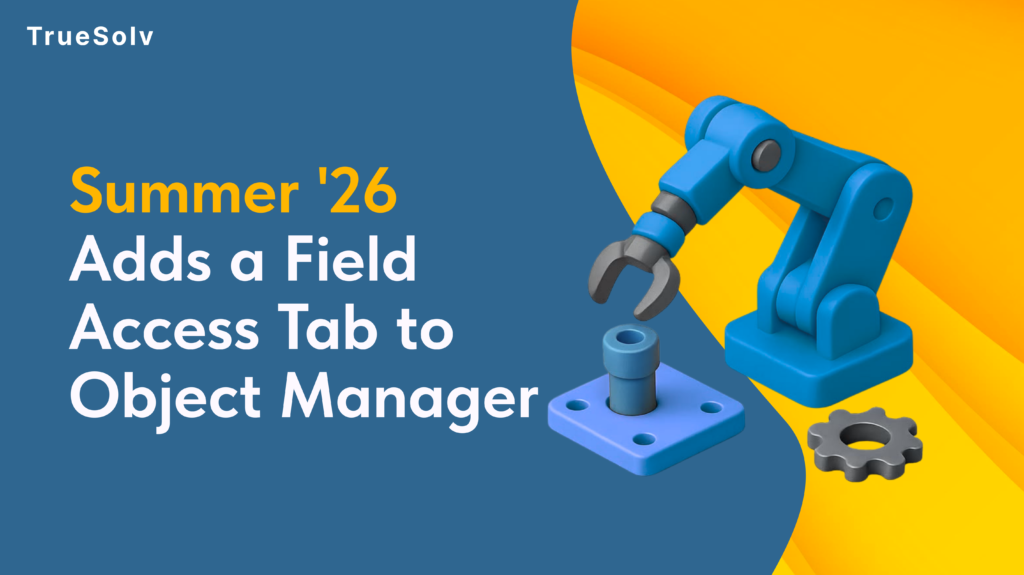
Any Salesforce admin who has ever done a field-level security audit knows the process: open a profile, navigate to object settings, find the field, note the access, repeat for every other profile, then repeat for every permission set. It is tedious, error-prone, and nobody does it as often as they should. Summer ’26 adds a Field Access tab directly to Object Manager that shows the full picture in one place. What the Field Access tab shows At the bottom of each object in Object Manager, a new Field Access tab lists every field on the object alongside a consolidated view of exactly how access is granted — across all profiles and permission sets — in a single interface. Previously, getting this view required navigating each profile individually, cross-referencing permission sets separately, and building a mental or spreadsheet-based picture of who can see and edit which field. For a mid-sized org with 20 profiles and 40 permission sets, that process takes hours and is almost guaranteed to miss something. The Field Access tab shows it in one view. One object, every field, all access configurations visible simultaneously. ⚡ Salesforce Setup → Object Manager → Opportunity → Field Access Opportunity Standard Object Details Fields & Relationships Page Layouts Validation Rules Field Access New All profiles and permission sets — one view Field Label Profile / Permission Set Access Granted Via Amount ✓ Read / Edit Sales Rep, Sales Manager Profile: Sales Rep · Profile: Sales Manager Annual Contract Value ✓ Read / Edit Finance, Admin📖 Read only Sales Rep Perm Set: Finance View · Profile: Admin Internal Deal Notes ✓ Read / Edit Sales Manager, Admin✗ No access Sales Rep, Support Perm Set: Manager Access · Profile: Admin Stripe Subscription ID 📖 Read only Finance, Admin✗ No access Sales Rep, Support, CS Perm Set: Finance View · Profile: Admin Read-only in Summer ’26. Edit permissions via Profile or Permission Set settings. Why this matters more than it sounds Field-level security is one of the most common gaps in Salesforce org audits. Orgs grow, permission sets multiply, profiles get copied from other profiles, and nobody has a clear picture of who can read or edit which field. Compliance audits, security reviews, and new admin onboarding all require this visibility — and getting it has always required more effort than it should. The Field Access tab does not change permissions. It makes the existing permissions visible and auditable at a glance. That distinction matters for compliance contexts specifically: the audit requirement is often to demonstrate that someone reviewed field access, not that they changed it. Summer ’26 makes that review faster, more reliable, and easier to document. Three situations where this saves significant time ✗ Before Summer ’26 1Open Profile 1 → Object Settings → navigate to field → note access level~3 min per profile 2Repeat for all 20 profiles. Build a spreadsheet.~60 minutes 3Open each permission set and check the same field. Add to spreadsheet.~30 min for 40 perm sets 4Cross-reference manually. Identify gaps. Probably miss one.~20 minutes 2+ hours. Error-prone. Often skipped. ✓ With Summer ’26 Field Access tab 1Open Object Manager → select object → click Field Access tab~30 seconds 2All fields listed. All profiles and permission sets in a single view.Immediate 3Search or scroll to the specific field. Access visible at a glance.~2 minutes 4Screenshot or export for the audit documentation. Done.~5 minutes total Under 10 minutes. Reliable. Auditable. Where the Field Access Tab Saves Significant Time 🔒Before a new team accesses sensitive account dataWhen a new department or external partner is being onboarded to Salesforce, reviewing field-level security on Account, Contact, or Opportunity objects is a required step. The Field Access tab makes this a 10-minute review instead of an afternoon, and makes the outcome documentable.Time saving: ~2 hours → ~10 minutes per object reviewed 📋GDPR and HIPAA-adjacent field visibility auditsDemonstrating controlled access to specific fields — email addresses, phone numbers, health-related custom fields — requires showing who has access and how it is granted. The Field Access tab produces that view without a manual cross-referencing exercise, making it audit-ready by design.Compliance requirement: access visibility is demonstrable in one screenshot 🔍Debugging a field not visible for a specific userA rep reports a field is missing from their record page. Previously: check profile → check permission sets → check page layout. With Field Access tab: search for the field, see all access configurations simultaneously, identify the gap in under 2 minutes.Debugging time: ~20 minutes → ~2 minutes What it does not do yet The Field Access tab is read-only in the initial Summer ’26 implementation. You can view field access across all profiles and permission sets, but you cannot edit permissions from this interface. Changes still require navigating to the profile or permission set and making edits there. Worth watching: The ability to edit permissions from the same view — which would make it genuinely powerful — is the likely Winter ’27 addition. The visibility improvement is real and significant now. Editing from the same surface is the logical next step. Field-level security has always been one of the hardest things to audit in a Salesforce org. Summer ’26 does not solve the permissions complexity — it makes it visible. That is the starting point for everything else. Salesforce Admin Summer ’26 Field Level Security Object Manager Salesforce Release Share: LinkedIn Twitter / X Copy link In this article 01What the Field Access tab shows 02Why this matters 03Three time-saving scenarios 04What it doesn’t do yet Field Access tab — quick facts 🆕Where: Object Manager → any object → Field Access tab (last tab) 📊Shows: All profiles and permission sets in one consolidated view 🚫Doesn’t do: Editing — read-only in Summer ’26 📅Available: Summer ’26 GA — sandboxes from ~May 9 Use this tab when… 🔒Onboarding a new team to sensitive data 📋Running a GDPR / HIPAA audit 🔍Debugging a missing field About the Author DK Dilyara Kolesnikova Salesforce Developer & Technical Writer at TrueSolv
How to Use Agentforce to Automate SaaS Renewal Protection
Most SaaS companies do not lose renewals because the product failed. They lose them because nobody noticed the signals in time — usage dropping, a key contact going quiet, a support ticket that never fully resolved. By the time the CS team follows up, the customer has already decided. Agentforce inside Salesforce changes this from a reactive problem to a proactive workflow. Proactive CS motions outperform reactive ones at every stage The signal arrives weeks before the decision. The question is whether your system is watching for it. 67%Higher renewal rate when CS reaches out proactively vs. waiting for the customer to initiate 14 daysAverage time between detectable usage decline and churn — the intervention window most teams miss 80+Accounts per CS rep at a 30-person SaaS company — volume that makes manual monitoring impossible SaaS industry renewal benchmarks. Specific percentages vary by product category, deal size, and CS team structure. Part 1: Why SaaS renewal churn is a data problem, not a people problem The CS team at a 30-person SaaS company is usually one or two people managing 80 or more accounts. They are good at their jobs. They are not able to proactively review every account monthly while simultaneously handling onboarding calls, support escalations, and renewal negotiations. The signals that predict churn are not hidden. Usage declining by 40 percent over two weeks is visible in your product analytics. A key contact going silent for 45 days is visible in your activity log. A support ticket that stayed open for 12 days before resolution is visible in your case management. The problem is that nobody is watching all of these signals simultaneously across 80 accounts. Agentforce agents can. They run continuously against your Salesforce data, evaluate conditions against defined thresholds, and take action when those thresholds are crossed — without requiring a CS rep to remember to check. The data advantage compounds over time. As agents surface patterns — which usage drops correlate with churn, which onboarding milestones predict expansion — your renewal playbook becomes more precise with each cycle. Part 2: What an Agentforce renewal agent actually does An Agentforce renewal agent is an automated system that monitors account health signals, evaluates them against configured thresholds, and takes a defined action when a threshold is crossed — without human initiation. Agentforce Renewal Workflow — How a churn signal becomes a CS action Data Signals • Usage −40% / 14d • No contact 45+ days • Open support tickets • Contract 60d away Monitors Agentforce Renewal Agent Evaluates all signals simultaneously • 24/7 Triggers Autonomous Actions Priority CS task assigned to account owner Account summary usage + contacts + tickets Churn risk flag renewal dashboard alert Draft renewal email queued for CS review No human initiation required. Agent runs continuously against Salesforce data. The distinction from a standard Salesforce Flow is the reasoning layer. A Flow fires when a condition is met. An Agentforce renewal agent evaluates the condition in context — weighing multiple signals simultaneously, generating a natural language summary of what it found, and drafting context-aware communication that a Flow cannot produce. Part 3: Three renewal agent workflows worth building first Workflow 1 60-day renewal outreach agent Trigger:Contract end date is 60 days away. What it does:Reviews account health signals — product usage trend over the last 30 days, open support issues, last contact date, any logged expansion signals. Drafts a personalised renewal email with specific context from the account record. Queues the draft for CS review with a task to approve or revise within 48 hours. Why it works:A calendar reminder tells the rep to follow up. This agent tells the rep what the account looks like right now, drafts the message, and makes the rep’s job to review and send — not to research and write. The rep’s 20 minutes of prep becomes 5 minutes of review. Expected outcome: Higher quality renewal outreach, earlier in the cycle, with no additional CS capacity required. Workflow 2 Churn risk alert agent Trigger:Product usage drops more than 40 percent over a 14-day window compared to the prior 14 days. What it does:Flags the account with a Churn Risk tag in Salesforce. Creates a priority task for the account owner. Generates an account summary: last contact date, open support issues, usage trend, contract value and end date, any recent expansion or contraction signals. Why 14 days:The most actionable churn signals happen 30 to 60 days before renewal. A 14-day usage decline detected at 60 days out gives the CS team time to intervene before the customer has made a decision. Detected at 5 days out, the same signal is too late. Expected outcome: CS team prioritises the highest-risk accounts with full context before the intervention window closes. Workflow 3 Post-onboarding health agent Trigger:New subscription start date is 30 days ago. What it does:Checks whether the account has hit three key activation milestones. If all three are met, logs the health check and takes no further action. If one or more are not met, creates a targeted outreach task with a guided onboarding checklist attached and flags the account for a CS review. Why it matters:Customers who do not activate in the first 30 days are significantly more likely to churn at their first renewal. A health check at 30 days identifies at-risk customers at the moment where intervention — a 20-minute call, a targeted email with specific steps — is most likely to work. Expected outcome: Improved 30-day activation rates, lower first-renewal churn, CS effort focused on accounts that need it. Agent workflow Trigger What the agent does Expected outcome 📅 60-day renewal outreach Contract end date is 60 days away Reviews account health, drafts personalised renewal email, queues for CS review with 48-hour approval task Higher quality, earlier renewal outreach. Rep prep: 20 min → 5 min review. ⚠️ Churn risk alert Product usage drops 40%+ over 14-day window Flags account, creates priority task, generates account summary with full context CS prioritises at-risk accounts with
Agent Script: The Layer Between AI Flexibility and Enterprise Control
The biggest complaint about AI agents in production has always been the same: they work great in demos and go off-script in real deployments. Salesforce heard that complaint and built Agent Script — a scripting language that lets you define exactly how an agent behaves, step by step, without giving up the flexibility that makes AI useful. Here is what it is, how it works, and why it changes the calculus on Agentforce adoption. Agent Behaviour: Without vs. With Agent Script WITHOUT Agent Script — probabilistic path WITH Agent Script — deterministic rails User request Path A Path B Path C Outcome depends on reasoning and conversation flow ⚠ Risk: agent may skip required verification if the user’s phrasing is persuasive or impatient User request Identity verified REQUIRED STEP — Agent Script AI handles response Verification tool call must return confirmed — no bypass ✓ Deterministic: required steps always execute AI reasoning operates within defined rails The problem Agent Script was built to solve AI agents are probabilistic systems. Give an agent a task and it reasons toward an outcome — evaluating options, choosing actions, interpreting ambiguous inputs — in a way that is flexible and often impressive but never fully predictable from the instruction set alone. For customer service, sales qualification, and internal help desk use cases, that flexibility is valuable. The agent can handle variations in how a question is asked, adapt to unexpected inputs, and reach correct outcomes through different reasoning paths. However, for enterprise deployments where specific steps must happen in a specific order — identity verification before account access, compliance disclosure before a financial recommendation, escalation to a human at a specific deal stage — probabilistic behaviour is a blocker, not a feature. The question is not whether the agent gets to the right answer. It is whether it follows the required path to get there. How Agent Script works Agent Script adds a deterministic layer on top of the AI reasoning layer. You define the fixed logic in a human-readable JSON expression language — the if/then rules, the required tool calls, the handoff triggers, the compliance checkpoints — and the LLM handles the conversational reasoning in between the defined steps. The mental model is a set of rails. Between the rails, the agent reasons freely and handles variation naturally. At the defined points on the rails, the behaviour is fixed: the agent must perform a specific action, verify a specific condition, or hand off to a specific resource before it can continue. Agent Script — identity verification before account access Simplified example // Step 1: Required identity verification // Agent cannot proceed until this returns “verified” { “step”: “verify_identity”, “type”: “required_tool_call”, “tool”: “IdentityVerificationService”, “condition”: { “result”: “verified” // must match — no bypass } } // Step 2: AI handles the response conversation // LLM reasoning operates freely here { “step”: “handle_account_query”, “type”: “llm_reasoning”, “context”: “account_data”, “guardrails”: [“no_pii_in_response”] } // Step 3: Handoff trigger if deal threshold met { “step”: “check_escalation”, “if”: { “deal_value”: { “$gt”: 50000 } }, “then”: { “action”: “handoff_to_human”, “queue”: “senior_sales_rep” } } Between the defined steps, the AI reasons freely. At the defined steps, the behaviour is fixed — the agent cannot proceed without completing the required action. The distinction from a traditional decision tree is important. Agent Script is not replacing AI reasoning with a flowchart. It is constraining the parts of the interaction where constraint is required while leaving the parts where AI is valuable free to operate as designed. Practical examples Customer service agent with identity verification Without Agent Script: The agent is instructed to verify identity before accessing account data. Whether it follows that instruction precisely depends on how the conversation goes — a persuasive or impatient customer might cause the agent to skip or abbreviate the step. With Agent Script: Identity verification is a defined step in the script. The agent cannot proceed to account lookup until the verification tool call returns a confirmed result. The LLM handles the conversation around verification, but the verification itself is not optional. Sales qualification agent with human handoff Without Agent Script: The agent is instructed to hand off to a human sales rep when a qualified opportunity reaches a specific threshold. Whether it recognises the threshold correctly depends on its interpretation of the conversation. With Agent Script: The handoff trigger is defined explicitly. When the deal value field exceeds the threshold, or when the prospect uses specific phrases indicating high purchase intent, the agent executes a defined handoff action to the Salesforce queue. The LLM does not decide whether the handoff happens; the script does. Integration with Agentforce Builder Agent Script integrates with Agentforce Builder — the conversational build environment introduced in Spring ’26. Admins and developers write Agent Script in the Builder interface alongside the natural language instructions that govern the agent’s conversational behaviour. The separation of concerns in the build environment mirrors the separation in the runtime: conversational behaviour is configured in natural language, deterministic controls are written in Agent Script. Neither replaces the other. Additionally, Agent Script was open-sourced at TDX 2026. The full specification, parser, and compiler are on GitHub. For compliance teams and legal teams who need to understand and audit agent behaviour independently of the vendor, this is significant: Agent Script is a readable, auditable format that does not require Salesforce expertise to understand the logic. Who needs Agent Script now, and who can wait Use case type Determinism non-negotiable Pure AI reasoning is fine Customer service — account access Identity verification must precede account lookup without exception. Agent Script enforces the required step regardless of conversation flow. Handling FAQ questions that do not involve personal data — product information, store hours, general policies. Financial services Regulatory disclosures must be delivered before a product recommendation. Compliance checkpoints cannot be skipped regardless of conversation length. Summarising publicly available market information with no personalised recommendation required. Sales qualification Handoff to a human rep must trigger at a specific deal stage or value threshold,
How to Use GEO in Salesforce Experience Cloud
SEO is not dead, but it has a new layer on top of it. Spring ’26 added Generative Engine Optimization to Salesforce Experience Cloud — a single toggle in Experience Builder that tells AI engines like ChatGPT, Perplexity, and Gemini how to read your portal content directly from the source. If your customers are starting their searches in AI chat instead of Google, this matters more than you might think. Here is what the feature does, how to turn it on, and which types of Salesforce sites benefit most. What Generative Engine Optimization actually does When a user asks ChatGPT or Perplexity a question about your product or service, the AI engine looks for publicly available content to ground its answer. If your Experience Cloud site is not set up to accommodate that process, the engine either ignores it or generates an answer from indirect sources — which may not reflect your current content accurately. GEO changes that by allowing AI bots to request a structured content snapshot of your public site pages. The snapshot gives the AI a clean, source-verified version of your content to work with, rather than a cached or scraped approximation. The result is that your portal becomes citable: when someone asks an AI assistant a question your help center or community site answers, there is a higher chance the answer comes from your actual content. This is the core difference from traditional SEO. Traditional SEO tells Google’s web crawler how to index your page for search ranking. GEO tells AI language model crawlers how to read and reference your page when generating answers. Dimension Traditional SEO GEO Target audience Google, Bing, and other traditional search engine crawlers AI-powered answer engines: ChatGPT, Perplexity, Gemini, Google AI Overviews Goal Rank higher in search results pages Be cited accurately in AI-generated answers Core mechanism Crawlable HTML, meta tags, backlinks, structured data, page speed Structured content snapshots that AI bots can request and process What it optimises for Click-through from a results list Accuracy and attribution when the user never sees a results list Where users see the result A link in a list of search results they click through An answer that cites your content directly in the AI interface Requires publishing Crawled on Google’s schedule, not yours Snapshot reflects your content as of the last site publish How to enable in Salesforce SEO settings: page title, meta description, canonical, sitemap Experience Builder → Settings → SEO → enable GEO toggle → republish Replaces the other? No — parallel tracks for parallel channels. Both are worth managing. Where to find the toggle and how to enable it The GEO setting lives in Experience Builder under the SEO settings panel. The path is: Experience Builder → Settings → SEO → Provide content snapshots of public site pages when requested by AI bots Enable the toggle, then republish the site. The setting takes effect on the next publish. It applies to both Aura and LWR sites and is available in Enterprise, Performance, Unlimited, and Developer editions. There is no additional configuration required at the page level. The toggle works across all public-facing pages on the site. Pages behind authentication are not included — GEO only applies to content that is publicly accessible without a login. How to Enable GEO in Experience Builder Spring ’26 — 3 steps 1 Open your Experience Cloud site in Experience Builder Navigate to the site you want to update. You need Admin access or a profile with Experience Cloud site management permissions. Setup → All Sites → Builder 2 Go to Settings → SEO and enable the GEO toggle In the left panel, open Settings. Select SEO. Find the option labelled “Provide content snapshots of public site pages when requested by AI bots” and enable it. Settings → SEO → AI bots toggle → ON 3 Publish the site The GEO setting takes effect on the next publish. Click Publish in Experience Builder to apply the change. The setting then applies to all public-facing pages on both Aura and LWR sites. Publish → Confirm Available in Enterprise, Performance, Unlimited, and Developer editions. Applies to public pages only — authenticated content is not included. What a content snapshot actually is A content snapshot is a static HTML version of your page that AI crawlers can request and process. It is optimised for machine reading rather than browser rendering — it strips out the dynamic elements, JavaScript-rendered content, and navigation chrome, and returns the core textual content of the page in a clean format. For AI engines, this is more reliable than attempting to crawl a JavaScript-heavy page where the main content only appears after client-side rendering. Furthermore, it means the snapshot reflects what is actually published in your Salesforce CMS, not a cached version from weeks ago. The practical implication is accuracy. If your help center article says your product supports a specific integration, the snapshot contains that exact statement. The AI engine citing your content has a verified source, rather than a reconstructed one. Which Salesforce portals benefit most from enabling GEO Which Salesforce Portals Benefit Most from Enabling GEO Public pages only 📖 Self-service help centers and knowledge bases Articles, FAQs, and troubleshooting guides are exactly the content AI engines look for when answering product questions. GEO makes your help content the cited source instead of a paraphrased approximation. Highest impact 🤝 B2B partner portals with public documentation Product docs, integration guides, and pricing pages are actively searched by B2B buyers using AI research tools. A GEO-enabled portal appears in that research process; one without it does not. High impact 💬 Community sites with publicly visible content Community answers to product questions are high-value for AI engines because they reflect real usage. If your community is publicly viewable without login, GEO makes that content accessible in the right format. Good candidate 🏢 Customer-facing product or service information sites Any Experience Cloud site where prospects or customers look up your features, plans, or support
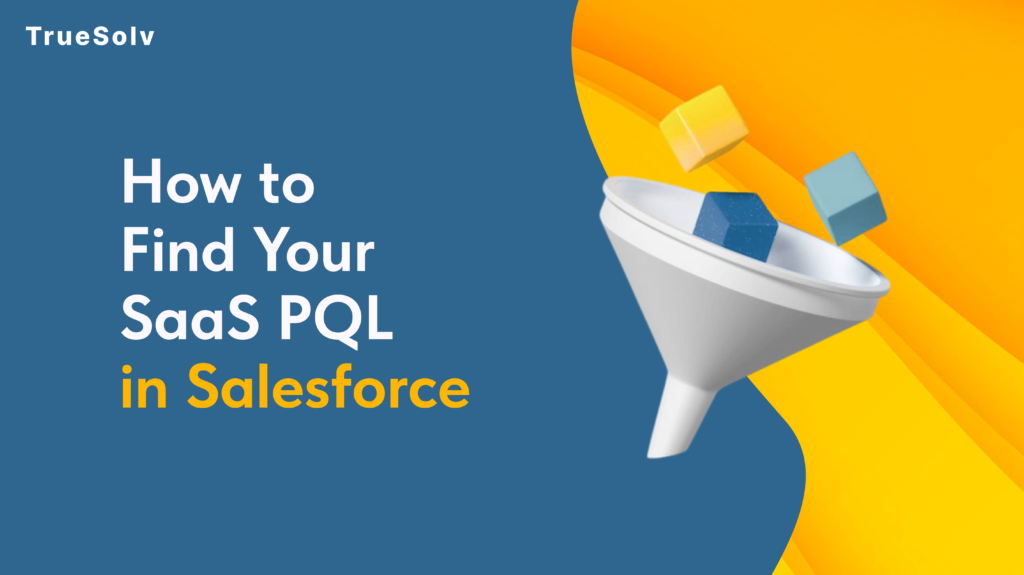
How to Find Your SaaS PQL in Salesforce
Product-led growth gets talked about as a marketing strategy. It is actually a data strategy. The moment a user signs up for your free trial, they start telling you exactly how likely they are to pay, through every click, every feature they open, and every session they skip. Most SaaS sales teams have no idea any of that is happening. None of it is in their CRM. What is a Product-Qualified Lead? A Product-Qualified Lead, or PQL, is a user who has reached a meaningful milestone inside your product. They activated a key feature, hit a usage threshold, invited a teammate, or upgraded their storage. Whatever the milestone is, they are doing the thing your product is designed to do. That makes them different from every other lead type in your funnel. A Marketing-Qualified Lead clicked an ad or downloaded an ebook. A Sales-Qualified Lead filled out a demo form. Neither has actually used your product. A PQL has, and in most PLG companies, that difference shows up as a 3% conversion rate versus a 25% one. Furthermore, PQLs are consistently underused. Not because companies do not want to act on them, but because the signal lives somewhere the sales team cannot reach. Why the PQL signal gets wasted without CRM integration Product analytics tools capture this data well. Segment, Mixpanel, PostHog, and Amplitude track every session, every feature interaction, and every drop-off point with precision. The dashboards are detailed. The data is there. However, your sales team is not in those dashboards. They are in the CRM. And in most PLG SaaS companies, those two systems do not talk to each other. The result is a structural disconnect. Your product knows which users activated three core features in a seven-day trial. Your reps are calling people who downloaded a whiteboard template six weeks ago. Meanwhile, the user who is two steps from converting sits uncontacted in your product database, not in your pipeline. This is not a prioritisation problem. It is a data infrastructure problem. Specifically, it is fixable. PLG Trial-to-Paid Funnel in Salesforce Trial Signup by source & channel Activation key feature milestone reached PQL Trigger usage threshold, invite, or score met Sales Action rep task auto-created in Salesforce Closed-Won Here is what four common PQL triggers look like in practice. 1. Trial activation trigger A user activates three core features within seven days of signing up. Salesforce creates a task for a rep to reach out with a targeted expansion message. The rep sees the activation data directly on the Lead record. 2. Churn risk alert A user’s engagement drops below their baseline for 14 consecutive days. Salesforce creates a CS alert before the churn event. The CS team can intervene with full context on what the user did and did not do. 3. Account expansion signal Five or more users at the same account invite colleagues during the trial period. Salesforce scores the Account higher and moves it into an expansion workflow automatically. 4. Free-to-paid attribution A free-to-paid conversion is tracked as a closed Opportunity, connected to the original trial Lead record. Marketing attribution becomes real, not estimated. Situation Without PQL data With PQL data in Salesforce Who reps contact first Demo form leads, regardless of product activity Users who activated key features, ranked by engagement score What reps see on a Lead record Name, email, company, source Features activated, sessions logged, days since last login, PQL status Churn detection Customer cancels, CS finds out after the fact Usage drop triggers CS alert at day 14, before churn event Free-to-paid attribution Estimated or modelled based on last-touch channel Closed Opportunity linked directly to original trial Lead record Account expansion signals No visibility until a user reaches out or upgrades manually Automatic score increase when 5+ teammates invited during trial PLG funnel visibility Sign-up volume and revenue, nothing in between Full funnel: signup, activation rate, PQL rate, closed-won from trial How to build this in Salesforce The most practical starting point is a set of Custom Fields on the Lead or Contact record that reflect product activity. You do not need a full Customer Data Platform to get started. You need a clean data feed and clear trigger logic. 3 PQL triggers worth setting up first 1 Feature activation trigger User activates 3 or more core features within 7 days of signing up. This is the clearest signal that the product is working for them, and the highest-intent moment to start a conversation. Trigger: 3 features in 7 daysAction: Rep task created in Salesforce 2 Churn risk trigger User engagement drops below their personal baseline for 14 consecutive days. Acting at day 14 gives CS enough lead time to re-engage before the user mentally cancels. Trigger: 14-day usage dropAction: CS queue alert in Salesforce 3 Account expansion trigger Five or more users from the same account invite colleagues during the trial period. Team adoption during trial is one of the strongest predictors of a paid conversion at the account level. Trigger: 5+ teammate invitesAction: Account score increase + expansion workflow Step 1: Define your PQL criteria Before any configuration, decide what product-qualified means for your specific product. Pick two or three behaviours that correlate with paid conversion in your existing data. Common examples include activating a specific feature, reaching a usage volume threshold, or completing an onboarding checklist. If you do not have conversion data yet, start with Salesforce Trailhead’s PLG resources or the Salesforce Admins blog for benchmark guidance on typical SaaS activation signals. Step 2: Connect your product data to Salesforce The most common paths are a native integration from your analytics tool, a Salesforce-connected webhook from your product backend, or a middleware tool like Segment Connections or Census. Each approach writes product events into Salesforce fields or Custom Objects. Step 3: Build the trigger logic in Salesforce Flow Use Salesforce Flow to create the automation. When a product field meets your PQL criteria, Flow triggers an action. That action
Your reps are not losing quota without Salesforce Time Tracking
Time disappears into meetings, emails, and CRM updates that nobody tracks
How to Enable Setup with Agentforce in Spring ’26
You know that moment when you are three tabs deep in Salesforce documentation, trying to remember where that one setting lives?
How To Debug Apex Code Without Losing Your Mind

Apex does not come with a pause button. There is no traditional breakpoint that stops execution and lets you poke around. What Salesforce gives you instead is a set of logging, inspection, and replay tools that, used well, make finding the problem faster than most developers expect. This guide covers the practical workflow from first error to confirmed fix, with examples at each step. Step 1: read the error before you do anything else Most debugging sessions start with someone jumping straight into the code. The error message is still the fastest path to the problem, and it is worth reading carefully before opening any tool. Salesforce Apex errors typically tell you the class name, the line number, and the exception type. A System.NullPointerException at line 42 in AccountTriggerHandler is telling you exactly where to look. A System.LimitException: Too many SOQL queries: 101 is telling you the problem is structural, not a typo. The three most common Apex exceptions and what they signal: NullPointerException A variable you expected to have a value is null. Usually means a query returned no records, or an object field was never set. LimitException A governor limit was hit. SOQL inside a loop is the classic cause of the 101 SOQL queries error. DmlException A database operation failed. Required field missing, validation rule violation, or duplicate record are the usual culprits. Step 2: add System.debug() to trace what is happening System.debug() is the starting point for most Apex debugging. It writes output to the debug log, which you can then read to understand what your code was actually doing at each point. Place debug statements before and after the line you suspect is failing, and log the values of the variables involved. Basic System.debug() usage Account acc = [SELECT Id, Name, OwnerId FROM Account WHERE Id = :accountId LIMIT 1]; System.debug('Account retrieved: ' + acc); System.debug('Owner ID: ' + acc.OwnerId); The LoggingLevel parameter controls how much noise you produce in the log. Use LoggingLevel.DEBUG for general tracing and LoggingLevel.ERROR for conditions that should never occur. Using log levels to filter output System.debug(LoggingLevel.DEBUG, 'Entering processAccount method'); System.debug(LoggingLevel.ERROR, 'Account is null – this should not happen'); System.debug(LoggingLevel.FINEST, 'Loop iteration value: ' + i); Setting the log level to FINEST captures everything. That is useful when you have no idea where the problem is. Once you narrow the location down, reduce it to DEBUG to keep the log readable. Step 3: enable debug logs and read them in Developer Console Debug statements only appear if logging is active for the user running the code. Setting up a trace flag takes two minutes and is required before any logging will appear. Go to Setup search for Debug Logs in the Quick Find box. Click New select the user you want to trace, set an expiry time, and choose a debug level. Start with SFDC_DevConsole if you are not sure which level to use. Reproduce the issue trigger the code by running the action that causes the error. Open Developer Console go to the Logs tab and double-click the most recent log entry. Use the filter type the class or method name you are debugging to isolate relevant lines from the noise. The log output includes a timestamp, event type, and the message from your System.debug() call. What to look for: USER_DEBUG lines contain your System.debug() output SOQL_EXECUTE lines show every query that ran and how many rows it returned DML_BEGIN and DML_END wrap every database operation CUMULATIVE_LIMIT_USAGE near the end of the log shows governor limit consumption Step 4: use Execute Anonymous to isolate and test When you want to test a specific piece of logic without triggering the full context of a trigger or flow, Execute Anonymous is the fastest tool available. It runs Apex directly in the org against real data, and the debug log appears immediately. Open it from Developer Console under Debug, then Open Execute Anonymous Window. Testing a query and inspecting results in isolation Id testAccountId = '0015g00000XXXXXX'; List<Account> accts = [ SELECT Id, Name, AnnualRevenue, OwnerId FROM Account WHERE Id = :testAccountId ]; System.debug('Records found: ' + accts.size()); if (!accts.isEmpty()) { System.debug('Account name: ' + accts[0].Name); System.debug('Annual revenue: ' + accts[0].AnnualRevenue); } This approach lets you confirm whether the data you expect to be there actually is, before assuming the logic is wrong. Many debugging sessions end here because the data was the problem, not the code. Step 5: use Apex Replay Debugger for complex flows For situations where System.debug() alone is not enough, VS Code’s Apex Replay Debugger lets you step through a captured debug log line by line, inspect variable values at each point, and set breakpoints on specific lines without stopping real execution. This is the closest Apex gets to a traditional debugger, and it is free with the Salesforce Extension Pack for VS Code. Open the Apex class or trigger in VS Code click in the gutter to the left of the line numbers to set a breakpoint. Enable the replay debugger open the Command Palette with Ctrl+Shift+P and run SFDX: Turn On Apex Debug Log for Replay Debugger. Reproduce the issue in the org trigger the code that is failing. Fetch the log Command Palette, then SFDX: Get Apex Debug Logs, and select the relevant log. Launch the replay Command Palette, then SFDX: Launch Apex Replay Debugger with Current File. Execution will pause at your breakpoints and you can inspect variable values in the VS Code sidebar. Replay Debugger does not run code again. It replays a captured log, so the variable values you see reflect what actually happened during the original execution. This is exactly what makes it useful for reproducing intermittent bugs. Step 6: identify governor limit issues before they become production problems Governor limits are the category of Apex errors that can reach production undetected in low-volume testing and then fail at scale. The most common is the 101 SOQL queries limit caused by queries inside loops. The pattern that causes 101
How To Choose A Salesforce Partner In 2026

Every Salesforce partner in 2026 has a deck. Slides about transformation. Words like agentic and data-native and AI-first. All of them sound prepared. Very few of them are asking about your business before they start selling you their methodology. Choosing wrong costs more than the invoice. It costs the months of internal time spent managing a partner that was never the right fit, the rework that follows a go-live nobody was proud of, and the political capital burned explaining to leadership why the CRM still does not do what it was supposed to do. The market in 2026 is noisier than it has ever been There are over two thousand registered Salesforce consulting partners globally. A significant portion of them have restructured their positioning in the last eighteen months to lead with AI. Some of them have earned that positioning. Others have added the word Agentforce to their website and called it a capability. The noise is not the problem. The problem is that buyers have less time to filter it than ever, and the signals that used to indicate quality, certification counts, tier badges, years in the ecosystem, are no longer sufficient differentiators on their own. A Summit-tier partner with eight hundred certified professionals can still assign your project to a team that has never solved a problem like yours. The right question is not which partner is most impressive. It is which partner is most likely to deliver the specific outcome your organisation needs, at the pace you need it, without creating a dependency you cannot get out of. Start with business alignment, not technical credentials The first conversation with a prospective partner should not be about their methodology. It should be about your business. What are the actual outcomes you need Salesforce to produce. Not features, not clouds, not integrations. Outcomes. A partner worth working with will ask what success looks like in twelve months and push back if the answer is vague. They will want to understand your sales motion, your service model, your data landscape, and your internal capacity before they suggest a solution architecture. If a partner has already drafted a proposal before understanding any of that, the proposal is not for your business. It is for the last business that looked roughly similar. Business alignment means the partner understands the commercial problem you are trying to solve and can connect every element of the implementation to that problem. It means they will tell you when a feature you asked for does not actually solve the problem, rather than building it because it was in scope. That kind of honesty is less common than it should be and considerably more valuable than a polished slide on transformation. Time-to-value is a strategy question, not a project management question Most Salesforce implementations take longer than planned. Some of that is scope change. Some of it is data quality problems nobody anticipated. Some of it is a partner that builds for elegance when the business needed something working by the end of the quarter. Time-to-value as a selection criterion means asking prospective partners how they sequence delivery. Do they phase the work so users get something useful early, or do they build the complete solution and hand it over at the end of a long engagement. The second model is fine for certain types of projects. For most CRM implementations, where adoption depends on users seeing value before they form opinions about whether the system works, phased delivery with early wins is materially better. Ask specifically for examples where a partner delivered measurable business value within the first sixty to ninety days of a project. What did that look like. What was the business outcome. If they struggle to answer with specifics, the concept of time-to-value may be on their website but not in their delivery approach. What AI and data depth actually means in a partner context Every partner claims AI capability in 2026. The useful distinction is between partners who can configure Agentforce features and partners who can design an AI strategy that is grounded in how your data is structured, how your processes work, and what your users will actually adopt. The first group can get Einstein features switched on. The second group can tell you why those features will produce poor outputs if the underlying data has not been unified, why a particular agent use case will not work in your service model without process redesign, and what the governance model for AI-generated content needs to look like in your industry. A straightforward way to test this is to ask a prospective partner about a situation where they recommended against an AI feature a client wanted to deploy. If the answer involves a conversation about data quality, user trust, or process readiness rather than just technical constraints, that is a partner operating at the right level of depth. If they have never had that conversation, they are likely saying yes to everything and hoping the outcomes follow. On Data Cloud and Zero Copy specifically, the partner should be able to explain the trade-offs between ingestion and federation without prompting. They should have a position on identity resolution at scale and know where it works well versus where it produces frustrating results. Platform enthusiasm is not the same as platform knowledge. Risk reduction as a selection criterion Risk in a Salesforce implementation comes from several predictable directions. Scope that was never clearly defined. A project team that is strong in presales and thin in delivery. Technical debt from a previous implementation that nobody fully disclosed. Data migration that was underestimated. Change management that was treated as a training exercise rather than an organisational commitment. When evaluating a partner, ask directly how they handle each of these. Not in general terms. With specific examples from projects they have delivered. A partner that has never dealt with a troubled legacy org, a difficult data migration, or a client whose internal teams were not aligned going
How Upload Custom Metadata Type from CSV
Salesforce said no to Data Loader for custom metadata. Here is what actually works. The first time most admins try to load custom metadata type records in bulk, they open Data Loader out of habit. Data Loader does not support custom metadata types. It never has. That is not an oversight. Custom metadata lives in the metadata layer, not the data layer, which means the tools built for data records simply do not apply. The good news is that there are three approaches that do work, and choosing the right one depends on who is doing the loading and how many records are involved. Why custom metadata types are different Custom metadata types store configuration, not transactional data. Validation rules, routing logic, feature flags, mapping tables, rate cards, and similar reference data all live there. Because they are part of the metadata layer, they are deployable between environments, version-controllable, and accessible in formula fields and flows without additional SOQL queries. That architecture is what makes them useful. It is also what makes bulk loading feel counterintuitive at first. You are not inserting records into a database table. You are deploying metadata through the Metadata API. Once that distinction is clear, the available approaches make considerably more sense. There are three reliable ways to load custom metadata type records from a CSV file. The Custom Metadata Loader app, the Salesforce CLI, and a Flow-based component. Each has a different profile in terms of setup effort, permissions required, and practical limits. Option one: the Custom Metadata Loader app The Custom Metadata Loader is a Salesforce-built tool available on GitHub. It was the standard approach before CLI commands became generally available, and it remains the most admin-friendly option for teams not using a developer toolchain. Setup requires a one-time deployment to the org, after which admins with the correct permission set can load records directly from the UI without touching a terminal. The tool uses the Metadata API in the background and can process up to 200 records per call. The setup process follows these steps: Download the Custom Metadata Loader from the Salesforce GitHub repository and create a zip file from the contents of the custom_md_loader directory. The package.xml file should sit at the top level of the zip, not inside a subfolder. Log in to Workbench with the target org credentials, navigate to Migration and then Deploy, and upload the zip file. Once deployed, go to Setup and assign the Custom Metadata Loader permission set to anyone who will use the tool. Open the Custom Metadata Loader app from the App Picker and configure Remote Site Settings if prompted. To load records, prepare a CSV file where the header row contains the API names of the custom metadata type fields. The Label or DeveloperName field is required in every file. Either one is sufficient to identify new records or update existing ones. If the org has a namespace, include the namespace prefix in the field API names in the CSV header. Duplicate Label or DeveloperName entries in the file will result in only the last row being processed. Upload the CSV file, select the corresponding custom metadata type from the dropdown, and click Create/Update. The tool will confirm how many records were processed and flag any errors in the output. The 200-record limit per call is worth noting. For larger datasets, the file needs to be split. For very large migrations, the CLI approach removes this constraint entirely. Option two: Salesforce CLI As of Summer 2020, the Salesforce CLI includes dedicated commands for custom metadata types. This is the approach Salesforce now recommends for development workflows, and it has no record limit. The relevant command for inserting records from a CSV file is: sf cmdt generate records –csv CountryMapping.csv –type-name CountryMapping__mdt This command generates the custom metadata record files locally in the project directory. The records then need to be deployed to the org using the standard deploy command: sf project deploy start This command generates the custom metadata record files locally in the project directory. The records then need to be deployed to the org using the standard deploy command: The CSV file format follows the same rules as the Loader approach. The header row must contain field API names, and either Label or DeveloperName is required. The DeveloperName value can only contain alphanumeric characters and underscores, must begin with a letter, and cannot end with an underscore or contain two consecutive underscores. Spaces in name values should be replaced with underscores. The CLI approach fits naturally into a DevOps pipeline. Records can be committed to version control, reviewed before deployment, and promoted through environments using the same workflow as any other metadata change. For teams already running a source-driven development model, this is the more sustainable long-term approach. The steps for a first-time setup follow this sequence: Install the Salesforce CLI and authenticate with the target org using sf org login. Create or open an existing SFDX project in VS Code. Retrieve the custom metadata type definition from the org so the project is aware of its field structure. Prepare the CSV file with the correct field API names in the header row. Run the cmdt generate records command, review the generated files in the CustomMetadata folder, and deploy to org. Option three: a Flow-based screen component For orgs where neither GitHub deployment nor CLI access is practical, a third option exists in the form of a community-built Flow screen component. This approach allows admins to upload a CSV directly from a screen flow in the org, with no external tooling required. The component was created by Salesforce MVP Narender Singh and is available through the UnofficialSF community. It handles the Metadata API calls internally, so the user experience is simply uploading a file and selecting the metadata type. This approach is most appropriate for one-off loads in environments with restricted developer access or where deploying external tools to the org is not straightforward. It is less
